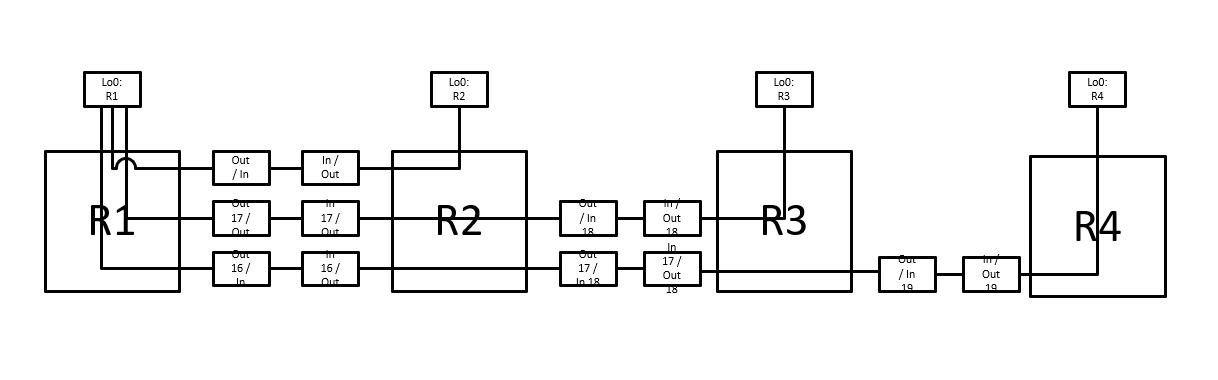
Let’s find out about (static) MPLS… from the start!

In this post we’ll discuss the motivation and a basic operation of an MPLS network. In the first part, we’ll introduce this protocol and our setup (using GNS3) that put it into play. We’ll try next, to explore the functionnality of this protocol using a very simple and basic example using both Cisco and HPE implementations.

So let’s give it a kick…

Introduction

label switching

First of all, MPLS stands for Multi Protocols Label Switching. We’re talking about labels not frames, packets nor datagrams. The use of “multi protocols” is to hint about the underlaying network protocols such as ATM, X.25, FR, etc.; the idea was to find a way to work with all these networks indifferently by adding some abstraction and without interfering with the internet layer (on OSI model) that specifies more the function of routing protocols (IGP, etc.) and addressing (logical) such as: IPv4, v6, IPX, etc.

multi protocol switching

Labels are kind of tags, a piece of information (32 bits long) that we put in between the layer 2 and 3, per the OSI model, information. But, theoretically, an Ethernet (that is a layer 2 OSI protocol) frame could be used to transport another Ethernet: the label is in between two layer 2 protocols or frames, if we expand this notion, we could easily talk about a “service” label-based transport (switching)… we can put as much labels (for different services) as we want if we stay under the limits of what other protocols specify as maximum frames lengths (usually FR cells have no size limit and ATM fixed ones).

other mpls motivation

Ease of routers configurations (hardware and software in the core network), augmented forwarding performance (speed, resiliency, etc.) and abstraction of the lower layers toward a unified architecture (more application oriented), etc.

mpls push, swap and pop label operation

An MPLS network is three parts: an ingress, core and egress. In ingress (MPLS) routers tag or labels are pushed into the frames and forwarded to the core. In the core netwrok, only MPLS switching (or swapping) based on tags, on swapping of tags or labels, is done, without the need for any content interpretation. At the egress (MPLS) routers get off, pop, the label and route the packets as usual… for the rest of this blog, we’ll call an MPLS switch/router and LSR (label switching router) and the forwarding path from the source to the destination, an LSP (Label switching path).

mpls label exchange

Another aspect of an MPLS network, is the exchange of label information. Let’s recall that labelling is a local notion the any MPLS switch, router: every MPLS node builds its local labels table based on the information it has on its routing table, dynamically (using protocols such as LDP) sent by neighbors (next hops) or statically by the administrator. In this post, we’ll begin by showing the function of MPLS using a static configuration and compare it to an IP routed network operation.

lab setup

Our network setup is shown in the next figure.

Our network is four routers that support MPLS operation. For test purpuses we configure four routes on each router corresponding the their loopback 0 interfaces.

Our routers are emulated using GN3 and use the Cisco IOS : C7200-ADVENTERPRISEK9-M, version 15.3(3)XB12.

simple static routing network

First of all, we configure static routing (using next hops) for R2, R3 and R4 loopback /32 networks to be reachable from R1 loopback interface.

The forwarding table (cef) is shown next.

Next, we check that pings work and show the followed path using the traceroute utility

A traceroute from the R1 loopback interface to R4 loopback interface shows the path used in both directions (from R1 to R4 and from R4 to R1).

Now let’s send some traffic to have an idea about our network performance

a repeated ping with different size packets (100, 1000 and 10000 byte sizes) gives us an idea about the minimum, average and maximum round-trip.

Now that we have put into play our static routing and got a grasp of its performance let’s configure our static MPLS LSP paths and do the same for comparison purposes

static MPLS switching

In the second part of our blog, we’ll enable MPLS swithing and configure statically the LSP. Let’s recall that an LSP is one way.

static LSPs

The next figure illustrates the logical idea behind its operation:

To statically MPLS switch a packet sourced from R1 Lo0 and sent to R4 Lo0 interface network we shoud specify two LSPs: one that indicates to R1, R2 and R3 what ingress (locally to each router) label to expect and what the egress (out) label to use toward the next hop and the other, to indicate the other way.

In our example a packet destined to R4 get tagged by 16, R2 expects a label value of 16 as sufficient information to forward the packet towards R3 using label 19; R4 expects no label, this why R3 sends the packet to her without any label (PHP procedure).

enable MPLS on Cisco routers

On our lab Cisco routers, to enable MPLS forwarding, we need : CEF (Cisco Express Forwarding to be enabled), mpls ip enabled on each interface (on the path), specified label range for static switching and a working IGP (in our case static routing is used).

We check that MPLS is enable on interfaces using the commande shown in the next figure.

Evenif LDP is enabled the exchanged labels are not used

We’ve already checked that CEF is enabled in the first path and that our IGP is working

configure the LSPs

We’ve dedicated label range from 16 to 99 to static label switching and at the end, we’ve configured the actual LSPs using the logic from HPE as show in the next figure

The configuration we used for router R3 as an example is:

ena
config ter
! R2
! add static lsp to all router lo0
!
mpls static binding ipv4 1.1.1.1 255.255.255.255 18
mpls static binding ipv4 3.3.3.3 255.255.255.255 17
mpls static binding ipv4 4.4.4.4 255.255.255.255 16
!
mpls static binding ipv4 4.4.4.4 255.255.255.255 output 123.0.23.3 17
mpls static binding ipv4 3.3.3.3 255.255.255.255 output 123.0.23.3 explicit-null
mpls static binding ipv4 1.1.1.1 255.255.255.255 output 123.0.12.1 explicit-null
!
end
wr
!

R2 expect in labels 18, 17 and 16 for destinations 1.1.1.1, 3.3.3.3 and 4.4.4.4 respectively. She does not need to label destinations 1.1.1.1 and 3.3.3.3 but labels the 4.4.4.4 egress by value 17.

traceroute to check our MPLS

To confirm that our MPLS switching is working we do a traceroute as show in the next figure

Please notice the difference between the first traceroute we’ve done in our first ip-based forwarding network and the MPLS switched network. The same could be checked against the drawing of our LSPs.

show the forwarding tables

Using show commands we confirm the forwarding information as shows in the next figure.

switching performance

Next we’ve extended our performance test to those configurations: ip forwarding with no cef and no route-cache, ip with no cef, ip with cef and mpls with cef. The next figure shows the resultats in time (ms) of sending 100 packets of different sizes (100, 1K or 10K bytes)

In general, the results how no difference… and it’s normal! we’re using GNS3.

as a conclusion

In this lab we’ve introduced some basic concepts of MPLS switching and the most prevalent motivations behind its use (abstraction of lower layer, scalability and speed of forwarding in the core). In the upcoming blogs, we’ll check other advanced topic about MPLS and its support of IGP (like OSPF, ISIS, etc.), BGP, TE (Traffic Engineering, RSVP), support of dynamic label distribution (LDP, MP-BGP, RSVP-TE, etc.) in a more oriented approach of “service” transport…

Hope this post ready was enjoyable… don’t hesitate to comment to enrich even more its content.

Leave a Reply

Table of Contents